Push Notifications + Angular + .NET Core

I'm sure 100% of you have already heard about what a push notification is, that's what apps and several web sites do to get your attention even if you don't have their app/website open. But the implementation of it might seem a little bit of magic for some. In this post, I'm going to cover how to implement push notifications in an Angular application and also how to handle these notifications differently when you have the app open.
As always, the source code covered in this post is available here
Push notifications in a web site is now possible due to service workers, which is something that's going to run in the background even if you don't have the website open. If you haven't heard about what service workers are, check out this post.
To get started, I'm going to use the .NET Core + Angular SPA template (if you want to know more about this template, check this post). Here are the very simple commands:
mkdir push-notification-angular-dotnet-core
cd push-notification-angular-dotnet-core
dotnet new angular
Here's our plan, the stuff we need to put together:
- A service worker in place to handle push events when the site is not open
- Register the service worker
- Create Public and Private keys
- A way to subscribe and unsubscribe to push events on demand. Basically, ask permission from the user to send push events.
- Handling push events
- Handling subscriptions in the server
- Send push events from the server
#1 Create our service worker
For now, we're just going to create a sw.js file in the assets folder. This is going to be our service worker.
#2 Register our service worker
Since we're using Angular, I want to do this in the neatest way possible, so I'm going to create a service for this using the Angular Cli:
cd ClientApp\src\app
ng g s core/notificationMiddleware
In the service, I'm going to create a few things. First I'm going to create an object to hold the state of push notification of the browser instance.
public pushNotificationStatus = {
    isSubscribed: false,
    isSupported: false
  };
An init method which I'm going to call from the app.component as soon as the app starts which is going to check if the current browser supports service workers and push notifications, if it does then we're going to automatically register the service worker (sw.js) we added to our assets folder. Also a checkSubscription method to update the isSubscribed flag.
init() {
  if ('serviceWorker' in navigator && 'PushManager' in window) {
    navigator.serviceWorker.register('/assets/sw.js')
      .then(swReg => {
        console.log('Service Worker is registered', swReg);

        this.swRegistration = swReg;
        this.checkSubscription();
      })
      .catch(error => {
        console.error('Service Worker Error', error);
      });
    this.pushNotificationStatus.isSupported = true;
  } else {
    this.pushNotificationStatus.isSupported = false;
  }
}

checkSubscription() {
  this.swRegistration.pushManager.getSubscription()
    .then(subscription => {
      console.log(subscription);
      console.log(JSON.stringify(subscription));
      this.pushNotificationStatus.isSubscribed = !(subscription === null);
    });
}
Now in the app.component.ts, we're going to inject the NotificationMiddlewareService and call the init method:
export class AppComponent implements OnInit {
  title = 'app';

  constructor(private notificationMiddleware: NotificationMiddlewareService) {
  }

  ngOnInit(){
    this.notificationMiddleware.init();
  }
}
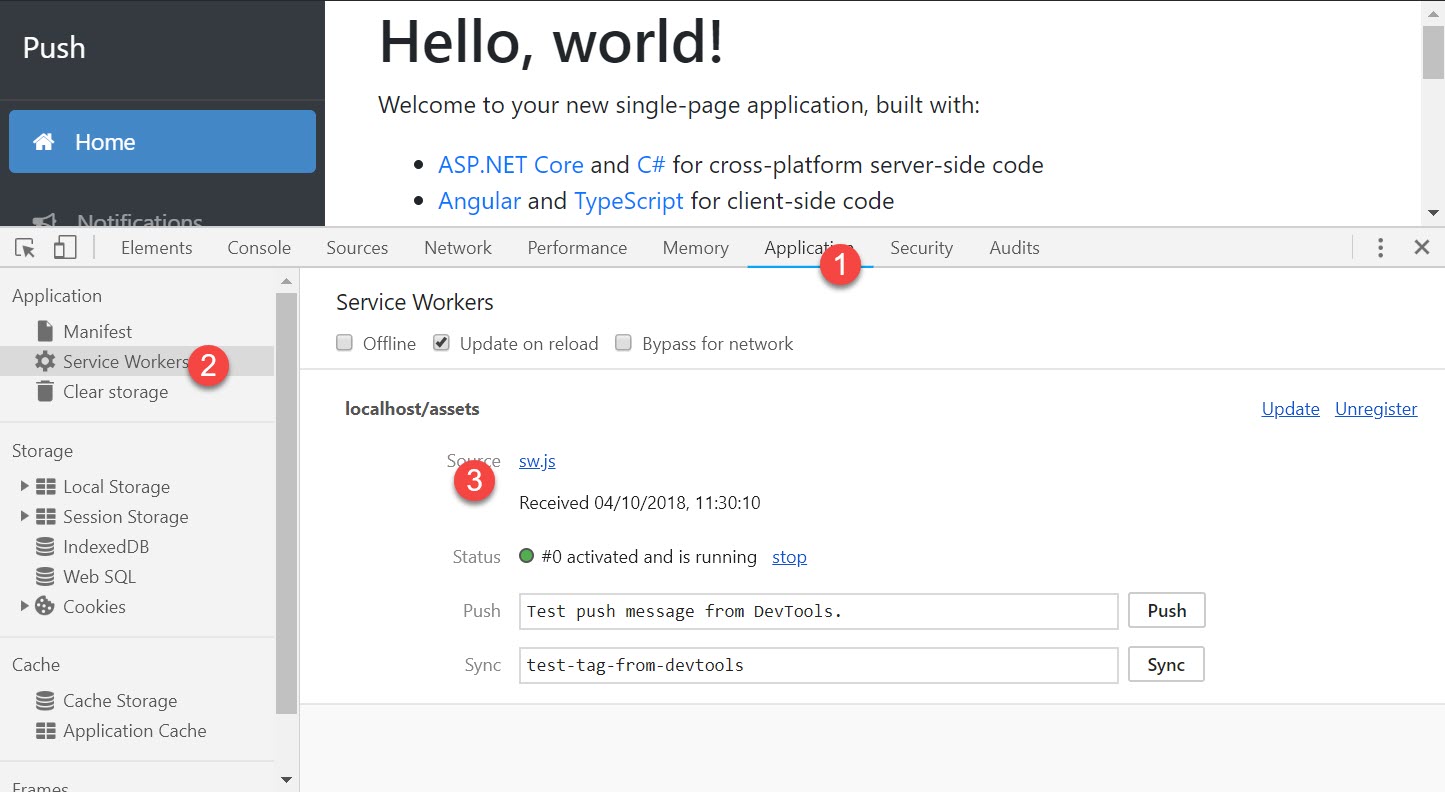
If we run ng serve in the ClientApp folder and go to the browser now, we should see the service worker installed by going to the Dev Tool bar > Application > Service Workers.
While in development stage, keep the flag
Update on reloadchecked, so every time you make changes to the service worker, it re-installs it automatically.
#3 Create Public and Private keys
Before we get to the next step which, we need a public and private keys so all the communication between the sender and the receiver is encrypted. There are several ways to do it, but the simpler way I found was via the website https://web-push-codelab.glitch.me. You can just go there and copy both the Public key and Private key. We're going to add our Public key to the environment.ts file:
export const environment = {
  production: false,
  applicationServerPublicKey: `[PUBLIC KEY]`
};
In the server side, we're going to add them to the appsettings.json.
{
  "VapidDetails": {
    "Subject": "[ORIGIN URL, EX:https://localhost:4201]",
    "PublicKey": "[PUBLIC KEY]",
    "PrivateKey": "[PRIVATE KEY]"
  }
}
#4 Subscribe and Unsubscribe
Instead of asking the user to trust the site as soon as they land on the site, it's a best practice that we ask for permission on demand so the user knows what he's agreeing to. So we're going to create subscribe and unsubscribe methods in the just created service and call this from the UI.
The subcribe method encrypts the public key and uses the pushManager to subscribe the user:
subscribe() {
  this.pushNotificationStatus.isInProgress = true;
  //check the source code to get the method below
  const applicationServerKey = this.urlB64ToUint8Array(environment.applicationServerPublicKey);
  this.swRegistration.pushManager.subscribe({
    userVisibleOnly: true,
    applicationServerKey: applicationServerKey
  })
    .then(subscription => {
      console.log(JSON.parse(JSON.stringify(subscription)));
      this.pushNotificationStatus.isSubscribed = true;
    })
    .catch(err => {
      console.log('Failed to subscribe the user: ', err);
    })
    .then(() => {
      this.pushNotificationStatus.isInProgress = false;
    });
}
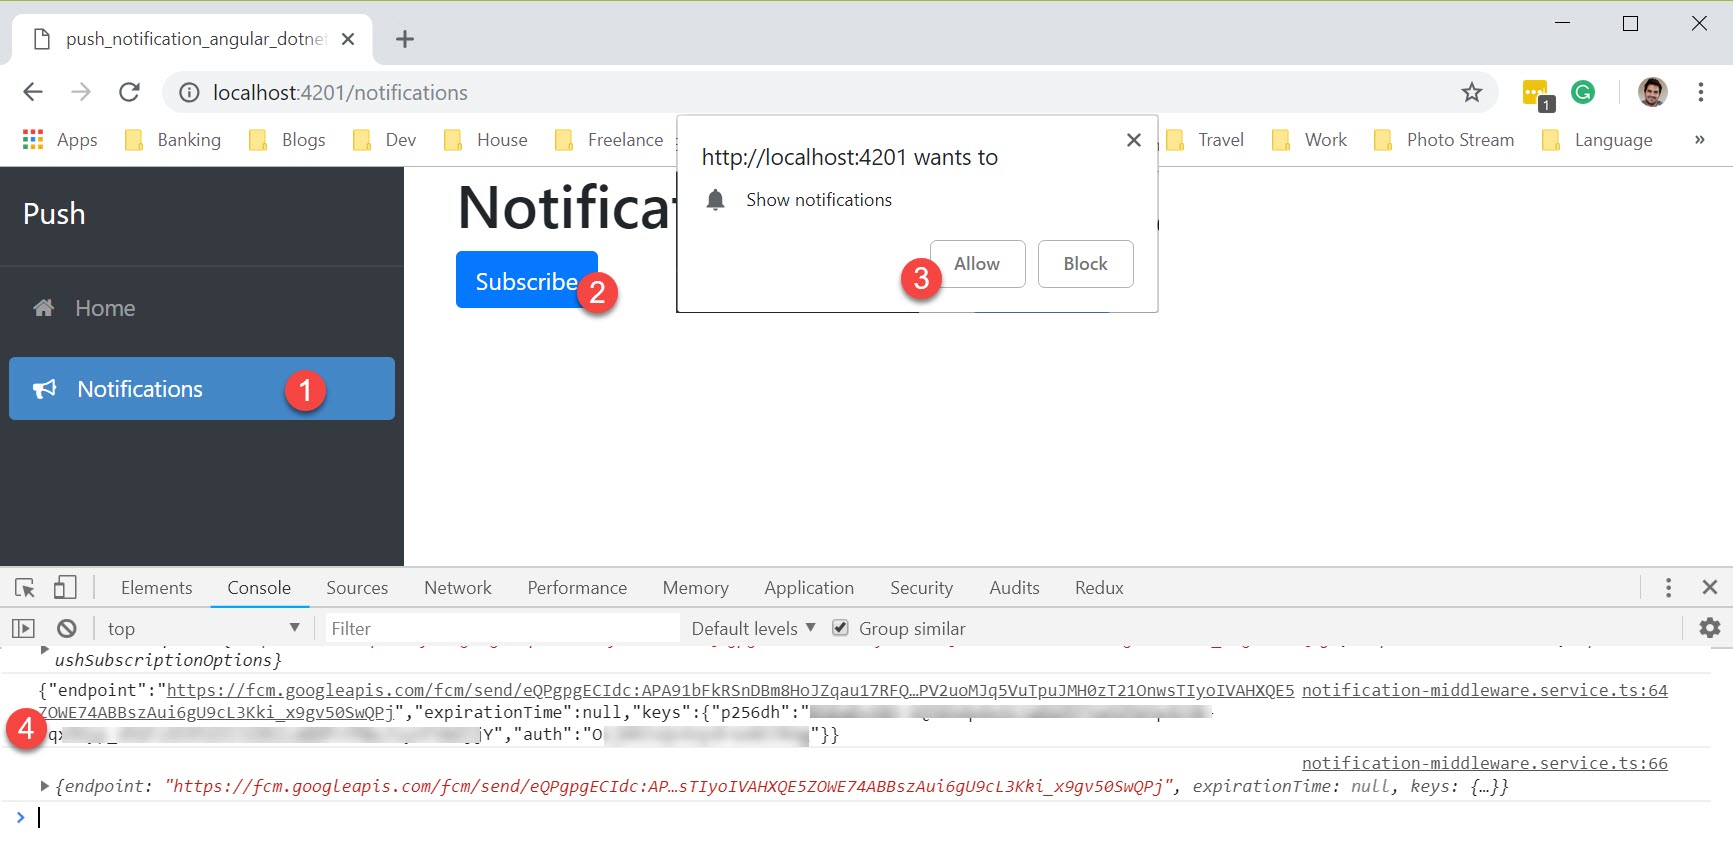
I've created a notifications component so I can add a button to call the subscribe method and as soon as I call it, the user will be prompted to either allow or block as per screenshot below. Once they allow, you should have the subscription which will have everything you need to send push notifications.
You might want to copy the subscription from the logs to test the push notifications later on
 .
.
The unsubscribe method will work very similarly:
unsubscribe() {
  this.pushNotificationStatus.isInProgress = true;
  this.swRegistration.pushManager.getSubscription()
    .then(function (subscription) {
      if (subscription) {
        return subscription.unsubscribe();
      }
    })
    .catch(function (error) {
      console.log('Error unsubscribing', error);
    })
    .then(() => {
      this.pushNotificationStatus.isSubscribed = false;
      this.pushNotificationStatus.isInProgress = false;
    });
}
In order to make my life easier, I've created a toggleSubscription method, since we already have a flag that recognizes if the user is subscribed or not:
toggleSubscription() {
  if (this.pushNotificationStatus.isSubscribed) {
    this.unsubscribe();
  } else {
    this.subscribe();
  }
}
#5 Handling push events
Now that we have a subscription, it's time to start handling push events. That's where the service worker is going to shine. Let's go now to the sw.js file.
WARNING: The service worker is javascript file, not typescript.
We're going to add an event listener for the push event.
'use strict';

self.addEventListener('push', function (event) {
    console.log('[Service Worker] Push Received.');
    var data = event.data.json();

    const title = data.Title;
            const options = {
                body: data.Message,
                icon: 'assets/push.png',
                badge: 'assets/push.png',
                data: data.Url
            };

            const promiseChain = self.registration.showNotification(title, options);

    event.waitUntil(promiseChain);
});
To test it out, let's go back to https://web-push-codelab.glitch.me and paste the subscription we got from the previous step. Notice that I'm sending a json document in the message, but you could send just text.
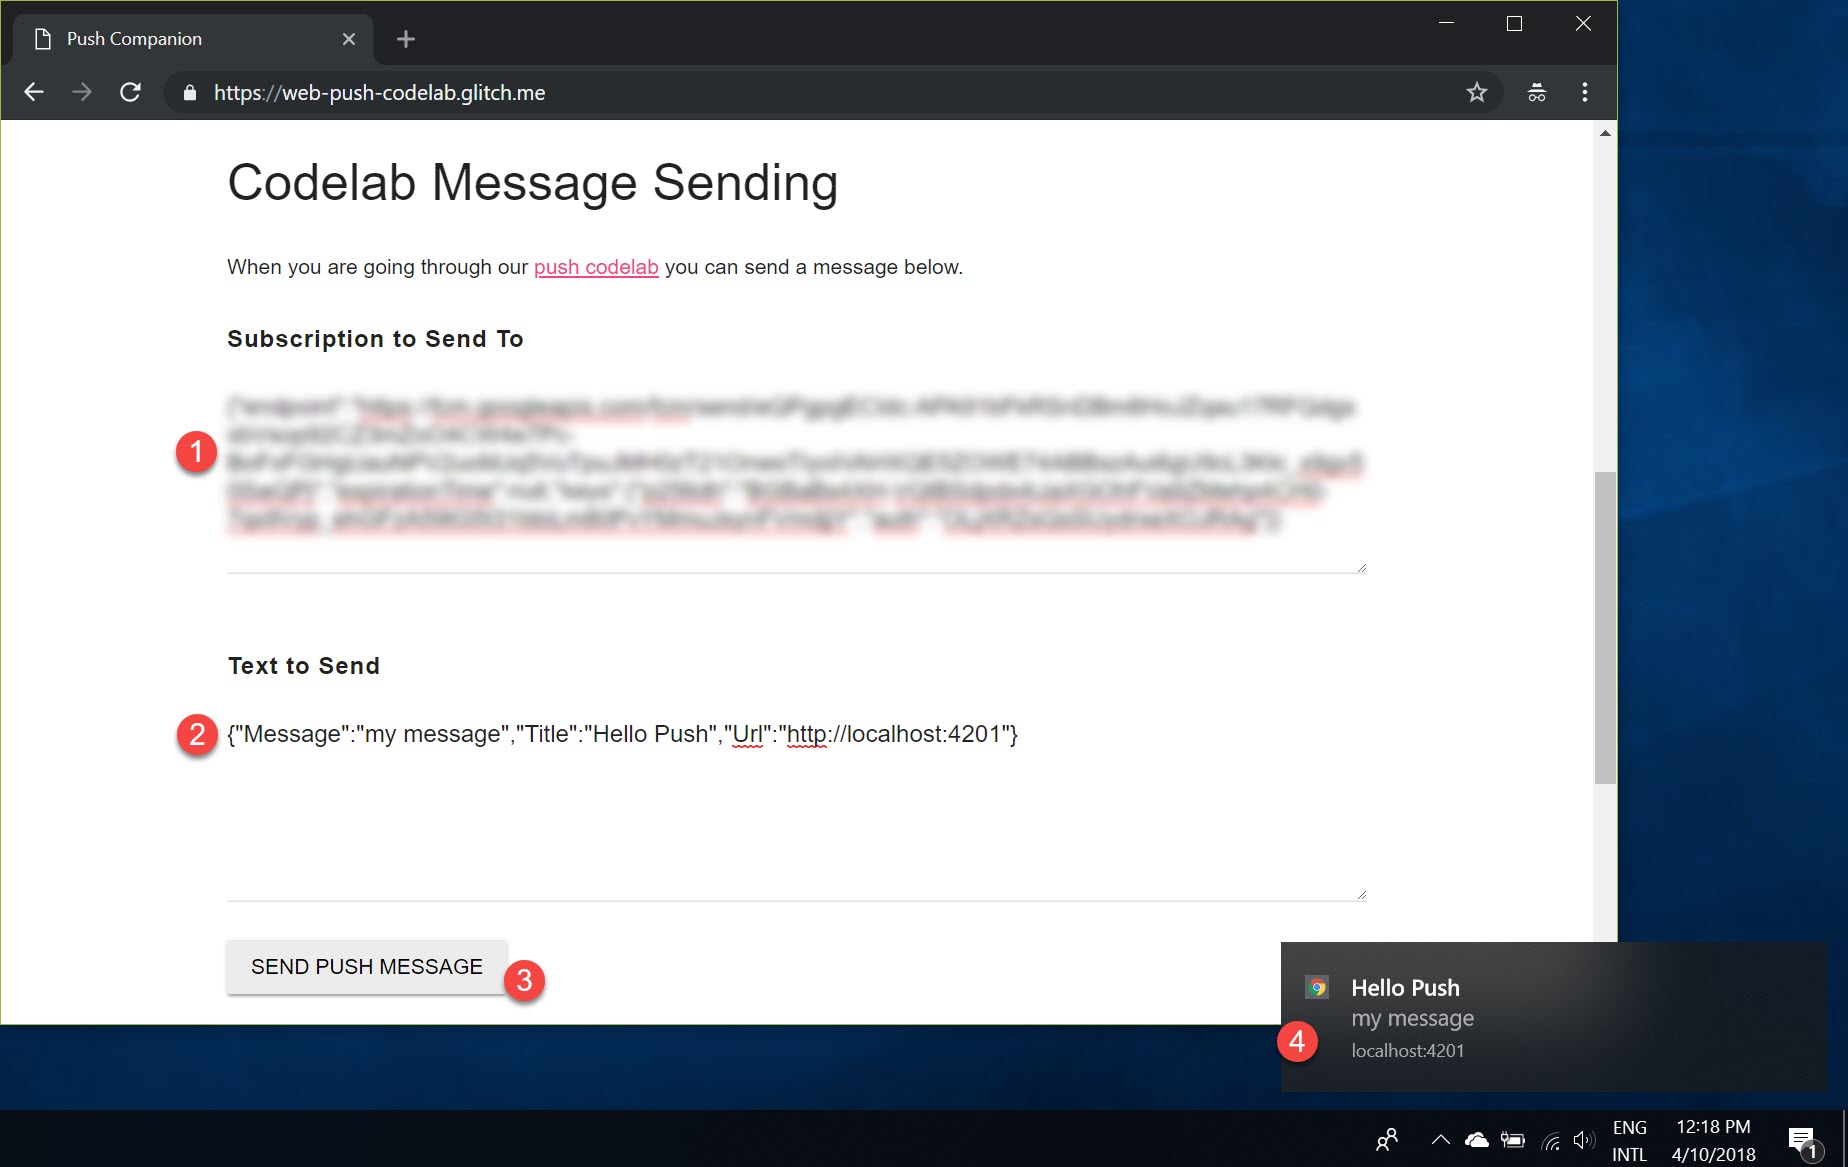
You probably noticed also that I added a Url to the json document I sent and I'm adding it to the options of the notification, but at this point in time, if you click on the notification, it's not going to do anything and that's because we have to start listening for another event, the notificationclick. So let's add it:
self.addEventListener('notificationclick', function (event) {
    const urlToOpen = new URL(event.notification.data, self.location.origin).href;

    event.notification.close();

    event.waitUntil(clients.openWindow(urlToOpen));
});
Great, now if you click on the notification, it will open the Url we sent.
Okay, but what if I already have a tab open of that site, or if I am on the site itself right now? It's going to be a pain in the bum to start getting all those push notifications and opening always a new instance. There's a solution for that, this post talks about all different approaches to improve the push experience which I'm implementing in the source code, but I'm not going to cover here as this post is already getting too long.
#6 Handle subscriptions in the server
For this section, we're going to need both the public and private keys we created in the step #3, also we're going to need to modify the subscribe and unsubscribe methods so it calls the API endpoints to manage the subscriptions.
For testing purposes, I'm going to save all the subscription into memory, but if you're going to implement this somewhere, be sure to persist the subscriptions somewhere else.
To send the push notifications, I'm going to use a nuget package called WebPush. I've also configured in the startup to inject the VapidDetails which are the details we need to send the push notification: Subject (Origin URL), Public and Private keys.
I've created a Notification controller to handle 3 things: Subscribe, Unsubscribe and Broadcast:
[ApiController]
[Route("api/[controller]")]
public class NotificationController : Controller
{
    public static List<PushSubscription> Subscriptions { get; set; } = new List<PushSubscription>();

    [HttpPost("subscribe")]
    [ProducesResponseType((int)HttpStatusCode.OK)]
    public void Subscribe([FromBody] PushSubscription sub)
    {
        Subscriptions.Add(sub);
    }

    [HttpPost("unsubscribe")]
    [ProducesResponseType((int)HttpStatusCode.OK)]
    public void Unsubscribe([FromBody] PushSubscription sub)
    {
        var item = Subscriptions.FirstOrDefault(s => s.Endpoint == sub.Endpoint);
        if (item != null)
        {
            Subscriptions.Remove(item);
        }
    }

    [HttpPost("broadcast")]
    [ProducesResponseType((int)HttpStatusCode.OK)]
    public void Broadcast([FromBody] NotificationModel message, [FromServices] VapidDetails vapidDetails)
    {
        var client = new WebPushClient();
        var serializedMessage = JsonConvert.SerializeObject(message);
        foreach (var pushSubscription in Subscriptions)
        {
            client.SendNotification(pushSubscription, serializedMessage, vapidDetails);
        }

    }
}
Back to the Angular side of the application, I'm going to update the subscribe and unsubscribe methods to call the server side endpoints.
In order to talk to the server, I've implemented OpenApi with code generation, to know more about it, check this post. My NSWAG is also in the source control if you need to re-generate the typescript file.
So now my subscribe method is calling
this.notificationService.subscribe(<PushSubscription>{
  auth: newSub.keys.auth,
  p256Dh: newSub.keys.p256dh,
  endPoint: newSub.endpoint
}).subscribe(s => {
  this.pushNotificationStatus.isSubscribed = true;
})
And the unsubscribe is calling
this.notificationService.unsubscribe(<PushSubscription>{
  auth: sub.keys.auth,
  p256Dh: sub.keys.p256dh,
  endPoint: sub.endpoint
}).subscribe(() => {
  this.pushNotificationStatus.isSubscribed = false;
  this.pushNotificationStatus.isInProgress = false;
});
#7. Send push events from the server
Alright, now to test it all out, I've created a broadcast component to call the broadcast endpoint in the notification controller. Let's see it in action.
- On the right hand side I've got Chrome which I'm going to broadcast the message from, on the left hand side Microsoft Edge.
- When I send the message, it broadcasts to everyone who's subscribed.
- I get a notification for Edge
- I get an in app notification for chrome since I have it focused.

Hope it helps. Have fun!!!
Cheers.