Angular2 Routing: Basics


What I'm covering in this post:
- Implementing Routing into a brand new Angular2 app created using Angular Cli
- Switching between routes
- Child routes
- Nested outlets
- Auxiliary/Named outlets
The source code covered in this post is available here
A lot of the content of this post can be found in the Angular2 docs as well.
Pre-requisites
I'm using Angular Cli to build and run the application. So to follow through the steps below, make sure you install the Angular Cli and all its pre-requisites. You can check their GitHub for more information.
Implementing Routing
Step 1 - First I'll create a Home component:
import { Component } from '@angular/core';

@Component({
    template: `<h1>Welcome Home!</h1>`
})
export class HomeComponent {
    constructor() {
    }
}
Step 2 - Now I go to my app.module to import and declare my Home component.
import { BrowserModule } from '@angular/platform-browser';
import { NgModule } from '@angular/core';

import { AppComponent } from './app.component';
import { HomeComponent } from './home/home.component';

@NgModule({
  declarations: [
    AppComponent,
    HomeComponent
  ],
  imports: [
    BrowserModule
  ],
  providers: [],
  bootstrap: [AppComponent]
})
export class AppModule { }
Step 3 - Now let's wire this up creating the app.routes.ts file.
import { NgModule } from '@angular/core';
import { Routes, RouterModule } from '@angular/router';
import { HomeComponent } from './home/home.component';

const routes: Routes = [
    { path: '', component: HomeComponent }
];

export const routedComponents = RouterModule.forRoot(routes);
Step 4 - We need now to import the RouterModule to our app.module.
...
import { routedComponents } from './app.routes'

@NgModule({
  declarations: [...],
  imports: [
    BrowserModule,
    FormsModule,
    HttpModule,
    routedComponents
  ],
  providers: [],
  bootstrap: [AppComponent]
})
export class AppModule { }
Step 5 - We're nearly there. One last thing though, in order to load the HomeComponent we have to update the app.component and add the router-outlet so it knows where to load the content of the HomeComponent:
import { Component } from '@angular/core';

@Component({
  template: `<router-outlet></router-outlet>`
})
export class AppComponent {
}
And there you go. Your routing is ready.
Switching Between Routes
Okay, so now that the routing is implemented, how can I switching between routes? Quite simple really, but first follow the steps 1 to 3 from previous section to create a new component called AdminComponent. At the end, our new app.routes should like this:
import { NgModule } from '@angular/core';
import { Routes, RouterModule } from '@angular/router';
import { HomeComponent } from './home/home.component';
import { AdminComponent } from './admin/admin.component';

const routes: Routes = [
    { path: '', component: HomeComponent },
    { path: 'admin', component: AdminComponent }
];

export const routedComponents = RouterModule.forRoot(routes);
We now have a default route and also an admin route. We're ready to add some links to the app.component to navigate between routes, but first let's change slightly the app.component.ts as the html will start getting a bit bigger and move the template to a separate file.
import { Component } from '@angular/core';

@Component({
  templateUrl: './app.component.html'
})
export class AppComponent {
}
We now let's add our so expected links to the new app.component.html file
<div class="app-nav">
	<a md-button routerLink="/">Home</a>
	<a md-button routerLink="admin">Admin</a>
</div>
<div class="app-content">
	<router-outlet></router-outlet>
</div>
Done! The routerLink="/" will redirect to the root path and routerLink="admin" to the admin path.
Child Routes
Alright, child routes are actually pretty simple, all we need is adding a children property to one of the routes and specify the child routes the same way we specify the parent ones. Something like this:
const routes: Routes = [
    { path: '', component: HomeComponent },
    {
        path: 'admin', children: [
            { path: '', component: AdminComponent },
            { path: 'users', component: UsersComponent },
        ]
    }
];
So in this case, for us to access the UsersComponent we have to go the route /admin/users, if we just go to /admin we're going to land on the AdminComponent
Nested Outlets
In a lot of scenarios we will want to have some sort of template for a specific route. The same way we have the whole template around the main router-outlet, we might want to have some common ui controls for the admin area, navigation or filters of some sort. That's where you can start nesting the outlets
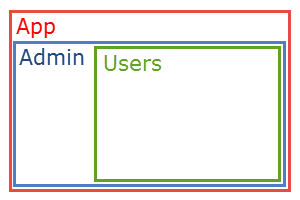
In the routes described in the Child Routes we have two children for admin: path:'' and path:'users', both of them will load in the main router-outlet specified in the app.component, but instead of loading this way, what I want to do is load the users.component inside admin.component inside app.component.
To achieve that I'll update my app.routes to look like this:
const routes: Routes = [
    { path: '', component: HomeComponent },
    {
        path: 'admin', component: AdminComponent, children: [
            { path: '' },
            { path: 'users', component: UsersComponent },
        ]
    }
];
I basically moved the component property from the first child of the admin route to the admin route itself. And after that what I have to do is update the admin.component template to include a router-outlet.
import { Component } from '@angular/core';

@Component({
  template: `
     <div>some common stuff used for all child routes</div>
     <router-outlet></router-outlet>
  `
})
export class AdminComponent {
}
Auxiliary/Named Outlets
Now, this requires a bit more configurations and we need to keep in mind where the router-outlet is located especially when working with child routes. For now, let's keep it simple. Let's update the app.routes and include a new route called share:
const routes: Routes = [
    { path: '', component: HomeComponent },
    { path: 'share', component: ShareComponent, outlet: 'bottom' },
    ...
];
You'll notice that a new property was introduced in this route outlet and this will tell the routing where this route needs to be loaded into. Now we have to update the app.component.html to include a new router-outlet.
<div class="app-nav">
    <a md-button routerLink="/">Home</a>
    <a md-button routerLink="admin">Admin</a>
</div>
<div class="app-content">
    <router-outlet></router-outlet>
    <router-outlet name="bottom"></router-outlet>
</div>
So now if I try to access the share route, this will be loaded inside the bottom outlet instead of the nameless one. Cool! But how do I access the share route? Can I just go to /share? Not really. The way navigation works for named outlets is a bit unconventional, it will look like this /(bottom:share). This will basically load the root route with the home.component but also will load the share.component inside the bottom outlet.
And how do I add a link to my html so I can access this route? Again a bit unconventional:
<a [routerLink]="['/',{ outlets: { 'bottom': ['share'] } }]">Share</a>
Here you go. These are the basics. Happy routing.